Thursday, May 30, 2013

Easy French Bread


My friend Christin was nice enough to teach bread making classes and I learned how to make french bread and it turned out amazing!  So some people have asked for the recipe.  So here goes! This picture is of the loaf I actually made at the class!  I give this recipe 5 stars!


This recipe yields 2 loaves

Ingredients:

1 1/2 Tbsp yeast (any yeast)
2 1/2 cups very warm water
3 Tbsp sugar
1 1/2 Tbsp salt
1/3 cup oil
6 to 6 1/2 cups flour

1 egg (whisked)

Directions:

In a large bowl or mixer, combine yeast, water, sugar, salt, and oil.  Mix in half of the flour.  Mix (or knead) the remaining flour in gradually, until it is smooth, and still sticky when you squeeze it but not when you tap it.  (about 6-8 min. on med speed in your mixer)

Allow the dough to rest for 20-30 minutes.

Turn raised dough onto a floured surface.  Lightly dust with flour.  Divide dough in half.  Roll each half into 9x12 rectangle.  Start at the long edge, roll and tuck in, as for a jelly roll.  Seal edge.  Place both rolls seam side down on a large greased baking sheet (or use parchment paper, it's easier!).  Slash top of each loaf diagonally 3 times (or more) with a sharp knife.  Brush with beaten egg, (the more you can brush on, the better).

Let rise 15-30 minutes, or when it looks nice and ready to bake.  Bake at 400 degrees for 25-30 minutes, (or until it has been reddish or golden brown all over for around 10 minutes, but remove if it is bordering on burning.)

Let cool for 10 min. before serving (so you don't flatten it!).


Monday, March 04, 2013

Chicken and Biscuits Pot Pie

I found this recipe while surfing through one of my favorite blogs eighteen25.  She was referencing the recipe from another blog that I had never been to before.  You can find the recipe here.  Anyway, as soon as I saw this picture for it, I knew I wanted to eat it!  Which meant I had to make it.  Good thing I'm supposed to cook every night.  So tonight I made it (I cheated a little on things which I'll explain later) but it was so good! The kids ate most of it (it has vegetables in it) and they actually liked it but didn't like the peas (not many kids do).  I give this recipe a 5!

The first part of the recipe is making the biscuits.  This is where I cheated.  I just used a can of buttermilk biscuits and it was great and saved me A LOT of time!  I also added a little shredded cheese to the top of each biscuit before I baked them.

So here's the recipe, give it a try!

Chicken and Biscuits Pot Pie
source: adapted from The New Best Recipe by the editors of Cook’s Illustrated
You can make this pot pie in either a 13×9-inch baking dish or individual oven-safe bowls (which I find cute but a nuisance) – just bake the bowls for 20-25 minutes.  The filling and biscuits can both be made in advance.  Keep them separate, reheat the filling before adding it to the baking dish(es) then proceed with the baking process as instructed in the recipe.
Ingredients:For the buttermilk biscuits
  • 1 cup all-purpose flour
  • 1 cup cake flour
  • 2 tsp baking powder
  • 1/2 tsp baking soda
  • 1 tsp granulated sugar
  • 1/2 tsp table salt
  • 4 tbsp (1/2 stick) unsalted butter chilled, cut into 1/4-inch cubes
  • 3/4 cup plus 2 tbsp buttermilk
For the chicken pot pie filling:
  • 1 1/2 tablespoons vegetable oil
  • 1 large onion, chopped fine
  • 3 medium carrots, peeled and cut crosswise 1/4-inch thick
  • 2 small ribs celery, cut crosswise 1/4-inch thick
  • Kosher salt and freshly ground black pepper
  • 4 tablespoons unsalted butter
  • 1/2 cup unbleached all-purpose flour
  • 1 1/2 cups milk
  • 2 to 2 3/4 cups low-sodium chicken broth
  • 1/2 teaspoon dried thyme
  • 3 tablespoons dry sherry (optional)
  • 3 to 4 cups (about 1 1/4 lbs) shredded chicken
  • 3/4 cup frozen peas, thawed
  • 3 tablespoons minced fresh parsley leaves
Instructions:
  1. To make the biscuits: In a large bowl, stir the flours, baking powder, baking soda, salt, and sugar together.  With a pastry cutter or your fingers, cut the butter into the dry ingredients until the butter resembles course meal with some larger butter lumps remaining.  Stir in 3/4 cup of the buttermilk with a fork until the mixture forms a soft, slightly sticky ball.  If the dough is too dry, add a little extra buttermilk – 1 tablespoon at a time up to 2 tablespoons.
  2. Transfer the dough to a well-floured work surface and pull it together into a ball with your floured hands.  Pat the dough out to 3/4″ thickness and cut out 12 rounds with a 3-inch biscuit or cookie cutter.  Transfer the biscuits to a parchment-lined baking sheet and chill until you’re ready to use them.  The biscuits can be made and kept covered in the refrigerator for up to 2 days in advance.
  3. To make the filling:  Preheat the oven to 400 degrees F. Heat a large heavy-bottomed pot or Dutch oven over medium-high heat and add the oil.  Once the oil is hot, sauté the onions, carrots, and celery until tender, about 5-7 minutes.  Season with salt and pepper to taste.  Transfer cooked vegetables to a bowl with the chicken; set aside.
  4. Reduce the heat to medium and add the butter to the same pot.  When melted, stir in the flour and cook, stirring constantly for 1 minute.  Whisk in the milk, chicken broth, and thyme.  Allow the sauce to come to a simmer and let it simmer for 1 minute to thicken.  Season with salt and pepper and stir in the sherry (if using).  Turn off the heat and transfer the vegetables and chicken to the pot, stirring until the filling is well-combined.  Mix in the peas and parsley.  If the filling is too thick (you’ll know), stir in the extra chicken broth, about 1/4 cup at a time up to 3/4 cup until the filling loosens up a little.
  5. Pour the filling into a 13×9-inch baking dish and bake for 18 minutes.  Remove the dish from the oven (keeping the oven on and door closed) and top the filling with the biscuits.  Return the baking dish to the oven and bake for an additional 10-12 minutes, until the biscuits are golden brown and the filling is bubbly.  Cool for 5 minutes before serving.

Thursday, December 13, 2012

Chicken Sausage, Sweet Potato and White bean soup

Last night I kind of made up my own recipe altered from another recipe found here: http://www.myrecipes.com/recipe/sweet-potato-sausage-kale-soup-10000001591026/

I had sweet potatoes I wanted to use up and it turned out really good with great flavor!

I give this recipe a 5!  Although the kids would rather there weren't sweet potatoes in it so maybe next time we'll do regular potatoes.  The nice thing about this soup is you could use any combination of meats and vegetables and I think it would taste great!  Sorry I forgot to take a picture of it!

Ingredients:

cooking spray (or 1Tbsp oil)
1/2 onion diced
4 cloves garlic minced
1 tsp salt
1/4 tsp crushed red pepper
6 or more fully cooked chicken sausage links (or other meat of your choice)
1 large sweet potato peeled and diced (about 3 cups)
3 (14.5 oz)cans chicken broth
2 cups water (I just filled one of the chicken broth cans up one time)
2 cans white beans (you could also substitute black)
1 cup half and half

Directions:

(If using a different type of meat that needs to be cooked, brown the meat first, drain it and then add onions, garlic, etc.)

Spray your pot with cooking spray (or use 1 Tbsp oil).  Add onion; sauté 5 minutes. Add 1/2 teaspoon salt, crushed red pepper, and garlic; sauté 1 minute.

Add chicken sausage to the pan, cook for 2 minutes to warm it.

Add the potatoes, water and broth and bring to a boil.  Reduce heat and simmer for 8 minutes.
Stir in remaining 1/2 teaspoon salt, beans and half and half; cook 5 minutes or until thoroughly heated.

Thursday, May 03, 2012

Follow Up Food Storage Taste Test

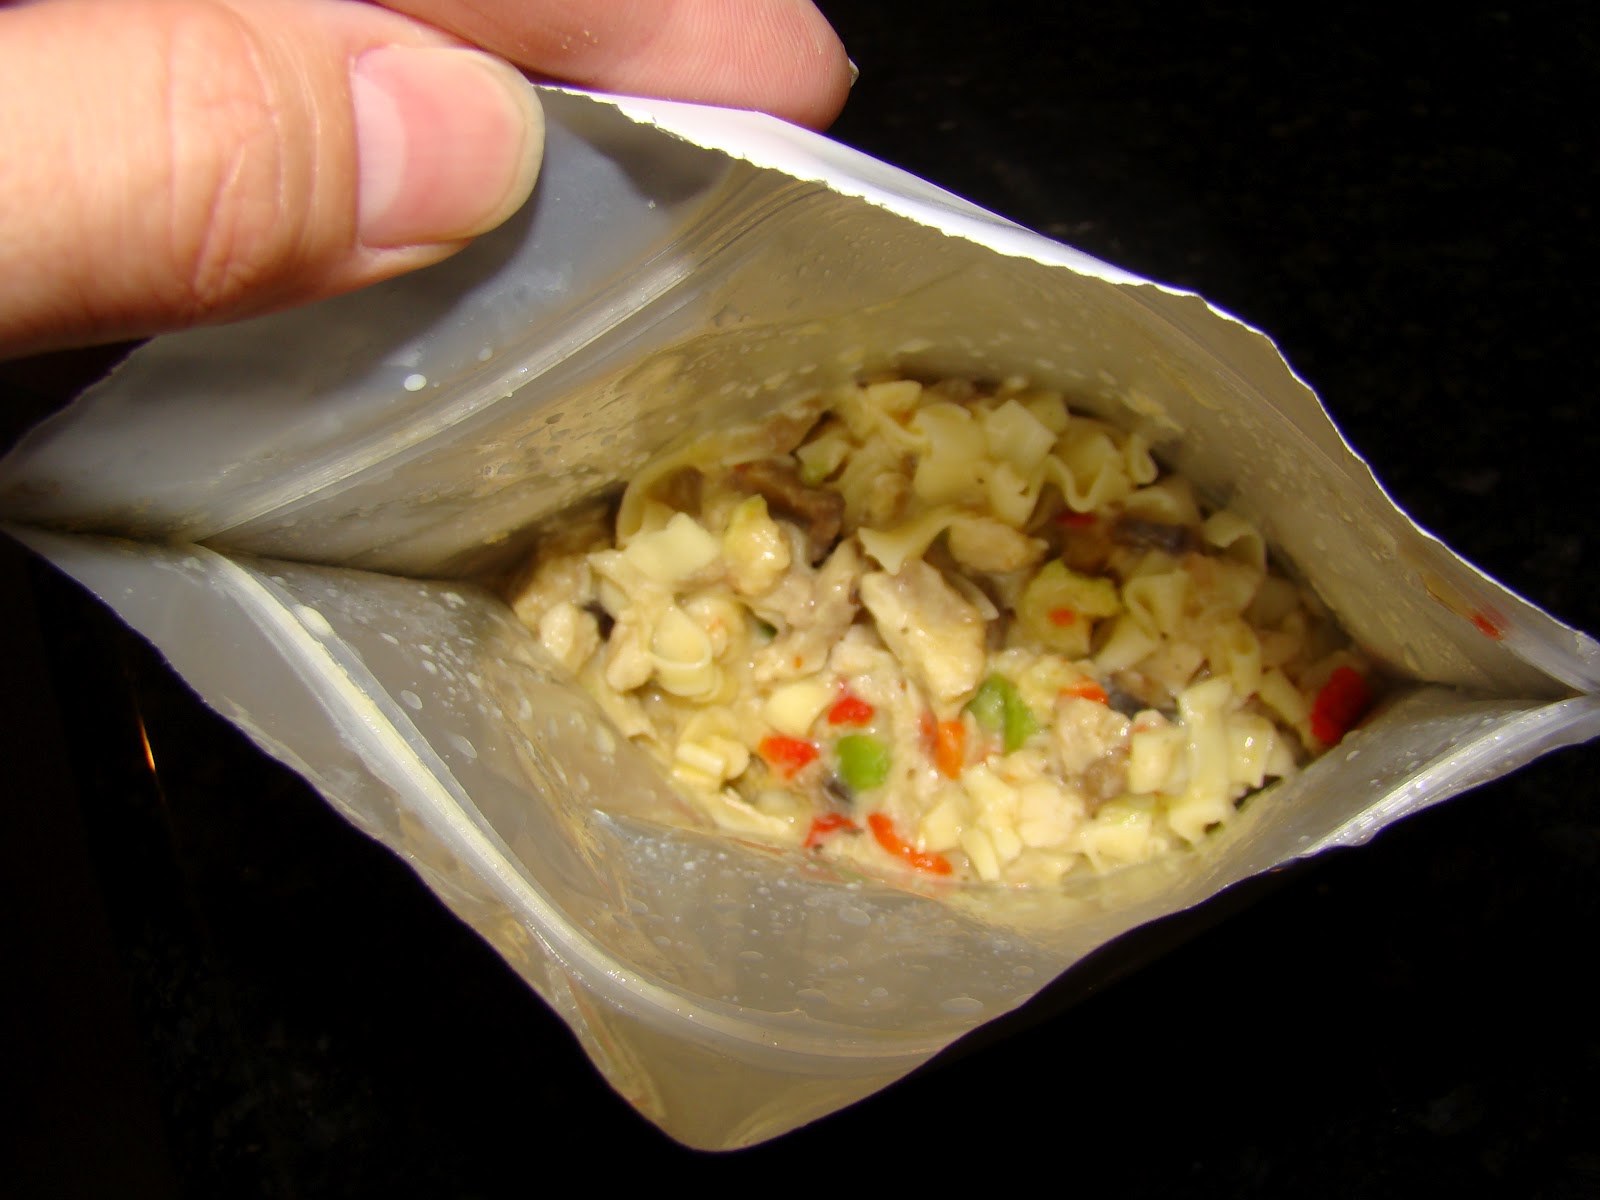
So I received my 2nd sample from Daily Bread.  They were very nice about it and had no problem sending me another sample.  This time they sent me Chicken a la King.

I followed the instructions exactly as it said on the bag again, adding 1 cup boiling water to the package and resealing it and then I let it sit for about 10 minutes.

Here's what it looked like this time when I opened it:

To me this looked much better than the watery lasagna from my last post.  Now onto how it tasted since that's what really matters!


Here's how it looked in a bowl out of the package (keep in my you can eat it straight from the package for convenience).

As you can see there are red and green things in it (vegetables) but to a kid (namely my kids) that's a deal breaker!  The kids liked the noodles but said they didn't like it overall because it had red and green things in it :)

My husband and I on the other hand really liked it!  I didn't feel like I needed to add salt to it like the lasagna and the chicken tasted great after it reconstituted.  I liked the noodles, the sauce and the vegetables in it.  So after this 2nd round of taste test I would definitely buy more from Daily Bread but maybe just not the lasagna.

Have you tried any of the food from these companies or any others?  Let me know what you like!

Wednesday, April 11, 2012

Food Storage Taste Test

UPDATE:  Daily Bread called today and said they would send me a different sample to try.  That they were aware of the wateriness of the lasagna and have since revised it to only add 3/4 cup of water instead of a full cup and then to let it sit 10-15 minutes instead of 8-9.

This will be a different kind of post from the normal ones.  Our church has asked us to prepare ourselves in the event of disasters, hardships, inclement weather circumstances, etc.  Part of that preparation is making sure we have a one year food supply for all members of our family.

In the past couple of years new companies have come out with products that are supposed to be ready made meals all you do is add boiling water and you have a meal.  The nice thing that they claim, is that these meals unopened will last on your shelf for 25 years!  Now to me, that's the easiest way to do food storage.  Buy it once (instead of rotating through it as the expiration dates on food come up) and forget about it for 25 years.  But if you need it, it's there and you just add water.

Now I'm skeptical about anything that is that easy.  Wouldn't you be?  This is what your family would have to live on if need be.  Will it taste good?  Will my kids eat it (that's the real question)?  Will it really last 25 years?

Two of the companies that I'm talking about are Daily Bread and The Wise Company.  I'm sure there are more companies that offer this service but these are the two I received samples from.  Both websites will gladly send you a free sample of a meal to try it out for yourself.

Here are the two samples I received.  Just as a side note, I didn't doctor up these pictures like I normally would in photoshop because I wanted you to see what they really look like to decide for yourself.

Each sample was a pasta of some sort.  Daily Bread was a Lasagna with Meat Sauce and Wise Company was Pasta Alfredo.  Both samples were around 300 calories and 11 grams of fat per serving.

Let's see how they did:


Daily Bread (Lasagna with Meat Sauce) Servings per bag: 1

This sample can be made in the bag for convenience.  All you do is add one cup of boiling water to the bag and then ziplock it closed and let it sit for 8-9 minutes, that is after you remove the oxygen absorber from the bag (hopefully you wouldn't forget to do that like I almost did).  I followed the instructions to the T (not very hard) and it may have actually sat in the bag a little longer than 9 minutes as I was waiting for the other sample.

Here's how it looked when I opened the bag.  

I'm not sure if you can see it or not but the sauce was very watery, you can see noodles and some meat and the tomatoes.

Here's how it looked on the plate (keep in mind I strained out the excess water and the white around it is from the other sample)


So it actually looks like it will taste good once it's out of the bag.  On the bag it says for convenience you can eat it straight from the bag.  So that's nice as well.
Upon tasting it though, it seemed really bland like it needed salt added to it.  The kids wouldn't eat more than one bite of it.  But then they don't like tomatoes or red sauce very well.  I wasn't a big fan of it but maybe I just needed to stir it more.  When my husband came home and tasted it, he said it was a little bland but that it was fine (keep in mind his sense of smell has always been partially blocked and therefore his tasting abilities are limited).  His serving had sat a little longer and was maybe mixed a little better than the serving we ate.

Wise Company (Pasta Alfredo) Servings per bag: 4

This sample needed a pot of boiling water (could not be cooked in the bag).  It required 4 cups of boiling water and then you added the contents of the bag, stirred it, covered it and let it sit for 12-15 minutes.    My husband was really skeptical that there was actually 4 servings worth of food in that small bag.  We were pleasantly surprised and even had leftovers!  It made a lot of pasta!

Here's what it looked like in the pot after 15 minutes:


Here's how it looked on the plate:


Upon tasting it, the sauce was really thick and my kids thought it was a cheese sauce (even though it was just alfredo).  Some of the kids had seconds.  They actually really liked this one.  I liked this one better myself.  The flavor was good, the noodles were soft and the sauce was thick.  Again my husband thought this was a little bland too but he liked it fine too (again take that for what you will).

My only complaint with this sample is that it was just noodles and sauce.  No meat, no vegetables.  But since I also have those options in my food storage already, I could easily add meat and/or vegetables to it.

So what's the verdict?  Before my husband tried the samples, I would definitely go with Wise Company.  It tasted better had a thicker sauce and the most important reason I would go with it, my kids liked it.  But after he tasted it, maybe Daily Bread just didn't get a fair shake...maybe...I'll have to do a follow up post.

After pricing both options, the Wise Company is actually quite a bit cheaper on the their packages than Daily Bread.  The difference is that the Wise Company only has so many options which is how they keep their costs low.  You don't get to make up your own packages, you get what is in them and that's it. On the other hand, Daily Bread has quite a lot of variety in their meals and you can mix and match the packages to your tastes.  So maybe we just don't order the Lasagna.

Now to be fair to Daily Bread, I emailed and asked for a sample of something different.  We received the lasagna sample about 2 years ago (which shouldn't matter since the food is supposed to last unopened for 25 years) and we got our Wise Company sample a week ago (I ordered it after I saw a commercial for it during General Conference).  But like I said that shouldn't matter since it has a shelf life of 25 years.  So after we get the 2nd sample, assuming they'll give us another one, maybe we'll like it better.

So what do you think?  Try it out for yourself and let me know if you receive different meals to try and what you think of them.  Here are the websites:

Daily Bread:  http://www.dailybread.com/

Wise Company:  http://wisefoodstorage.com/

Tuesday, February 21, 2012

Zuppa Toscana (like Olive Garden)

I needed to use up some spinach and potatoes and I found this recipe on Allrecipes.com.  It's Tim's favorite when we go to Olive Garden so I hope he likes it!  I think it tastes pretty similar!  I would give this a 5 for the sheer fact that my kids ate it!  My changes or notes are in red.

Ingredients

1 pound bulk mild Italian sausage

1 1/4 teaspoons crushed red pepper flakes  (I used less but it still had a kick to it)

4 slices bacon, cut into 1/2 inch pieces (I used refrigerated bacon bits)

1 large onion, diced

1 tablespoon minced garlic

5 (13.75 ounce) cans chicken broth

6 potato, thinly sliced

1 cup heavy cream (I used half and half and just added a little extra)

1/4 bunch fresh spinach, tough stems removed (I used baby spinach)

Directions

Cook the Italian sausage and red pepper flakes in a Dutch oven over medium-high heat until crumbly, browned, and no longer pink, 10 to 15 minutes. Drain and set aside. (I don't have a dutch oven, I just used a large pot)

Cook the bacon in the same Dutch oven over medium heat until crisp, about 10 minutes. Drain, leaving a few tablespoons of drippings with the bacon in the bottom of the Dutch oven. Stir in the onions and garlic; cook until onions are soft and translucent, about 5 minutes. (Since I wasn't cooking any bacon I just left the sausage in the pot and cooked the bacon bits, onions and garlic all together)

Pour the chicken broth into the Dutch oven with the bacon and onion mixture; bring to a boil over high heat. Add the potatoes, and boil until fork tender, about 20 minutes. Reduce the heat to medium and stir in the heavy cream and the cooked sausage; heat through. Mix the spinach into the soup just before serving.

Wednesday, December 14, 2011

Twice baked Sweet Potato Casserole with Bacon

Here's what to do with all those sweet potatoes you've got lying around :)  I LOVE sweet potatoes, but not everyone does.  I'm the only one in our family who does.  Tim will tolerate them but that's it.  Well I found this recipe in the Pillsbury Annual Recipes 2010 cookbook and I just had to try it!  I mean come on it has bacon in it!  It was awesome!  It made me love sweet potatoes even more!  The kids ate it ok but Tim actually liked it!  I give this recipe a 5!  As always my variations will be in red.

Ingredients:


6 lb dark-orange sweet potatoes (9 large or 12 medium)
8 oz bacon (8 to 10 slices)  (I used real bacon bits)
1/4 cup Progresso® panko crispy bread crumbs or Progresso® plain bread crumbs
1 tablespoon butter or margarine, melted
1/2 cup sour cream
1/4 cup butter or margarine, softened
2 medium green onions, chopped (2 tablespoons)
1/2 teaspoon salt
1/4 teaspoon pepper

Directions:
1 Heat oven to 350°F. Line 15x10x1-inch pan with foil; spray 13x9-inch (3-quart) glass baking dish with cooking spray. Pierce sweet potatoes several times with fork. Place in pan. Bake about 1 hour 15 minutes or until tender. Cool 10 minutes. When potatoes are cool enough to handle, peel potatoes and cut out any eyes or dark spots.

 2
Meanwhile, cook bacon as desired until crisp; chop. In small bowl, mix bread crumbs and 1 tablespoon butter; set aside.

 3
In large bowl, mash potatoes with potato masher. Stir in chopped bacon, sour cream, 1/4 cup butter, the onions, salt and pepper until well blended. Spread mixture in baking dish, or form individual servings in dish with 1/2-cup ice cream scoop or measuring cup. Sprinkle crumb mixture evenly over top.

 4
Bake 20 to 30 minutes or until thoroughly heated and bread crumbs just begin to brown.

Wednesday, November 02, 2011

Pumpkin pie!

Ok it's November!  Time for pumpkin pie!  We were slackers this year and didn't get around to carving and decorating pumpkins this year.  We have 3 of them and they happen to be the pumpkin pie pumpkins so I would feel bad letting them go to waste and I heard that making your own pumpkin puree for pumpkin pie is so much better than canned so I thought I'd give it a try!  It was great!  Something was a little off with the crust (that's what I get for using store bought) but the pumpkin was amazing!  I had never roasted a pumpkin before so I looked it up on, you guessed it, Our Best Bites!  That recipe comes complete with step by step picture instructions. They have everything on there!  So here you go again getting 2 recipes in one!  Giving it a 5!

Pumpkin Puree:

Step 1: Preheat oven to 350 degrees. Slice pumpkin in half and remove stem. You can cut it in quarters if you want, or just leave it halved. It doesn’t really matter. I cut mine in quarters so you could see the insides better.

Step 2: Using a spoon, scrape out all of the stringy stuff and the seeds. If you want to toast the seeds (shown below), make sure to save all this junk in a bowl and not the trash can! You’ll be left with just the pumpkin rind and the flesh.

Step 3: Spray a foil-lined baking sheet with non-stick spray. Place your pumpkin cut-side down on the sheet.  Also, during this step, I would recommend covering the pumpkin with another piece of foil. I’ve never done that before, but I noticed the sticker on my pumpkin advised doing so. And I figure those pumpkin people might know a little somethin’ somethin’ about roasting pumpkin. Mine sometimes turn out a bit dry and I think covering them with foil might help keep some extra moisture in. On the flip-side, depending on your pumpkin, it may be overly moist instead. See the solution to that in step 6!

Step 4: Cook pumpkin in your 350 degree oven for 50-60 minutes or until it’s tender when pierced with a fork. When done, remove from oven and let cool on the baking sheet.

Step 5: Use a spoon to scrape out the flesh and discard the skin/rind. It should be super soft and easy to scoop right out, kind of like scooping out an avocado.

Step 6: Place pumpkin pulp in a food processor and process until smooth. (Or you can just mash it with a fork or potato masher) Now. If your pumpkin is on the dry side, you can add a little water (or juice depending on what you’re making) at this point to get the consistency you want. My pumpkin was dry and I was aiming for the consistency of canned pumpkin so I slowly drizzled in about 1/4 cup of water until it had the right feel. If it’s too moist, just put your puree in a strainer to let some of the moisture seep through.

At this point you can use it in any recipe that calls for pumpkin puree or canned pumpkin. (Check out some of my faves at the end of this post!)
FYI: I used a 2-lb. pumpkin and it yielded 1 3/4 C puree. And if you are trying to gauge- One 15 oz. can equals 1 3/4 cups pumpkin puree and one 29 oz. can (the biggie) equals 3 1/2 cups pumpkin puree. So my 2lb pumpkin was almost exactly equal to one can.

And now onto the pumpkin pie recipe I used.  Which was actually the one off of the Libby's canned pumpkin label!

Ingredients:

  • 3/4 cup granulated sugar

  • 1 teaspoon ground cinnamon

  • 1/2 teaspoon salt

  • 1/2 teaspoon ground ginger

  • 1/4 teaspoon ground cloves

  • 2 large eggs

  • 1 can (15 oz.) LIBBY'S® 100% Pure Pumpkin  (or 1 3/4 cups of the pumpkin puree)

  • 1 can (12 fl. oz.) NESTLÉ® CARNATION® Evaporated Milk

  • 1 unbaked 9-inch (4-cup volume) deep-dish pie shell

  • Whipped cream (optional)


  • (I used pumpkin pie spice instead of the cinnamon, ginger and cloves)

    Directions:

    MIX sugar, cinnamon, salt, ginger and cloves in small bowl. Beat eggs in large bowl. Stir in pumpkin and sugar-spice mixture. Gradually stir in evaporated milk.

    POUR into pie shell.

    BAKE in preheated 425° F oven for 15 minutes. Reduce temperature to 350° F; bake for 40 to 50 minutes or until knife inserted near center comes out clean. Cool on wire rack for 2 hours. Serve immediately or refrigerate. Top with whipped cream before serving.

    Tuesday, November 01, 2011

    Italian Meatball Soup


    Ok I'm really on a roll with Our Best Bites!  I am loving their recipe book!  This recipe comes from them again!  It was awesome!  It's actually 2 recipes in one since you make your own meatballs to go in the soup.  My kids kept asking for more meatballs and more noodles.  Well at least they ate it!  I was looking for a recipe to use up the spinach from our co-op and this worked wonders!  I give both recipes a 5!


    Here's the meatball recipe first:

    Italian Meatballs:
    1/2 lb. lean ground beef (I actually used ground turkey instead)
    1/2 lb. Italian sausage
    1/4 c. dry bread crumbs
    1/2 tsp. pepper
    2 Tbsp. dehydrated onion
    2 eggs, lightly beaten
    2 Tbsp. freshly grated Parmesan cheese
    1 tsp. basil
    1/2 tsp. parsley
    1-2 cloves garlic, minced
    1 tsp. salt*
    *If you want, you could substitute all the Italicized ingredients with 3 Tbsp. garlic bread seasoning found here.
    Gently combine meatball ingredients in a medium bowl. Shape into balls, whatever size you like, but I prefer using my standard cookie scoop (about 1 Tbsp.) to shape meat into balls and then rolling it between my hands to make them even more round. Place on a broiler pan and broil until the meatballs start to brown–I actually use my toaster oven. Just because I can. Remove from oven and set aside until ready to use (or freeze for later use).

    And now the soup recipe:

    Italian Meatball Soup

    Ingredients:

    1 recipe of Italian Meatballs
    1-2 Tbsp olive oil
    1 onion chopped
    4-5 cloves garlic, minced
    5 (14 oz) cans chicken broth
    1 cup water
    1 (28 oz) can crushed tomatoes
    1 Tbsp italian seasoning
    2 carrots, peeled and diced
    1 cup small pasta uncooked
    2 cups spinach, thinly sliced

    Directions:

    1. When preparing the meatballs, make them small and bite-sized.  Broil the meatballs according to the recipe directions until they are just brown and can maintain their shape.

    2. While the meatballs are cooking, heat 1-2 tablespoons olive oil in a large stockpot.  Saute the onions and garlic until translucent.  Add broth, water, tomatoes, and Italian seasoning.  Heat to boiling.  Gently add the meatballs, carrots, pasta and spinach.  Reduce heat to a simmer and cook for 10 minutes or until the meatballs are cooked through, the carrots are tender, and the pasta is al dente.

    Monday, October 17, 2011

    Chicken and Dumplings

    Ok I just made an amazing dinner tonight!  How amazing might you ask?  So amazing that all 3 children had 2nds and my oldest had 3rds!  3 helpings of dinner?!  That is unheard of!  So if you like chicken and dumplings, you have to try this recipe.  It comes from Our Best Bites cookbook and it is, you guessed it, amazing!  I give this recipe a definite 5!

    Ingredients

    6 cups chicken broth (1 1/2 boxes or 3 cans) OR 6 c. water + 6 chicken bouillon cubes
    1 lb. cooked chicken, cut into bite-sized pieces (I use 1/2 of a fauxtisserie chicken and it’s FABULOUS! You could also use leftover rotisserie chicken from the grocery store)
    1 c. sliced carrots
    2 ribs celery, chopped
    1 onion, minced
    2-3 cloves garlic, minced or pressed
    1 bay leaf
    1 handful of chopped fresh parsley (or 1 Tbsp. dried parsley)
    1/2 tsp. basil
    1 12-oz. can evaporated milk (fat free is fine)
    1 recipe of Bisquik dumplings (recipe is on the box) or 1 small package of Kluski noodles

    Directions

    In a large pot, heat some olive oil over medium heat and add onions and garlic. Saute for a few minutes and then add chicken broth, chicken, bay leaf, and basil. Bring to a boil. Add carrots and celery and reduce heat to a simmer. Cover and cook until carrots and celery are tender. When carrots and celery are almost done, add chopped parsley. Add evaporated milk. Increase heat to boiling and add noodles or add prepared Bisquik by small spoonfuls (they’ll really puff up while they’re cooking). Cook until noodles are tender or until dumplings are cooked through (they should appear moist but feel firm; this is after about 4-5 minutes).

    Note from author: One other thing–if you know you’ll have leftovers, only add dumplings or noodles to what you know you’ll eat immediately. The noodles/dumplings will soak up all the liquid in the soup when you store it as leftovers, so you’ll have overly-mushy noodles and chicken with no broth if you don’t. The other thing you can do is add all of the dumplings or all of the noodles, and then store the dumplings or noodles separately from the rest of the soup. That’s easy to do with dumplings, not so much with noodles.

    Friday, September 16, 2011

    Stuffed Bell Peppers

    Our co-op has been getting a lot of green and some red bell peppers so my fridge is overloaded with them and I thought I'd try my hand at making stuffed peppers.  I found a great recipe on the Skinny Taste blog that I have just loved!  I've made it twice now and it's just amazing.  I then talked to my friends in our produce co-op and have since gathered a few other recipes to try out so I'll share those as well.  My favorite part about the one I've tried is that it's low in calories!  I am loving this blog!  Anyway, I give this recipe a 5!  As always my changes or comments are in red.  What are your favorite stuffed pepper recipes?!

    Ingredients
    • 1 lb lean chopped turkey meat (or ground beef)
    • 1 garlic, minced
    • 1/4 onion, minced (I used green onions)
    • 1 tbsp chopped fresh cilantro or parsley
    • 1 tsp garlic powder
    • 1 tsp cumin powder
    • salt to taste
    • 3 large sweet red bell peppers, washed (in her blog she really emphasizes using red, I tried green, red is better)
    • 1 cup fat free chicken broth
    • 1/4 cup tomato sauce
    • 1 1/2 cups cooked rice
    • Olive oil spray
    • 1/4 cup reduced fat shredded cheese
    Directions

    Heat oven to 400°. Spray a little olive oil spray in a medium size saute pan and heat on a medium flame. Add onion, garlic and cilantro to the pan. Saute about 2 minutes and add ground turkey. (If you use ground beef, you'll want to drain the fat first then add the onions, garlic and cilantro to cook) Season with salt and garlic powder, and cumin and brown meat for several minutes until meat is completely cooked through. Add 1/4 cup of tomato sauce and 1/2 cup of chicken broth, mix well and simmer on low for about 5 minutes. Combine cooked rice and meat together.

    Cut the bell peppers in half lengthwise, and remove all seeds. Place in a baking dish. Spoon the meat mixture into each pepper half and fill it with as much as you can. Place all stuffed pepper halves on the baking dish and pour the remainder of the chicken broth on the bottom of the pan. Cover tight with aluminum foil and bake for about 35 minutes. Top with shredded cheddar cheese and enjoy. (I top them with cheese before I cook them and they come out great!)

    Now for the other stuffed pepper recipes:

    Super Easy stuffed peppers from Jena Sivula

    Ingredients:

    2 Large or 4 small bell peppers
    1 box Spanish Flavor Rice-A-Roni (I use the Whole Grain Brown Rice Variety in the Red Box)
    1/2 lb. ground beef or turkey (you can use more than this but I wouldn't use less)
    1/2 cup shredded cheddar cheese (once again, you can use more but I wouldn't try less)
    1 chopped fresh tomato (optional)

    Directions:

    Brown the ground beef. Cook up the rice a roni per package directions (I leave out the oil. you could do this in the pan with the beef and save a dish). Make the peppers into boats/shells by cutting off the tops and seeds of the small peppers or cutting large ones in half and de-seeding. Place in a shallow baking dish (with a lid if you want to cook it in the microwave). Mix the beef, rice, tomato, and half the cheese together. At this point you could also add corn or chopped peppers if you want. Stuff the mixture into the shells, mounding on top if necessary. Sprinkle with remaining cheese. Add 1/4 cup of water to the bottom of the pan. Cover with foil and bake at 350 F for 20-25 minutes (depending on how crunchy you want the peppers, colored bell peppers will cook faster) OR cook in the microwave for 8-9 minutes. You can put these together up to a day before and keep them in the fridge before cooking.
    Enjoy! Serve with sour cream and salsa, if desired.

    Southwest Stuffed Bell Peppers (Our Best Bites)
    Ingredients: 

    4 very large or 6 medium sweet peppers (red, yellow, or orange)
    1 Tbs salt
    1/2 C white rice (or brown if you want to take the time to cook it), quinoa also works
    2 Tbs olive oil
    1 onion, diced
    3 garlic cloves, minced
    1/2 – 1 jalapeno, minced (or you could sub a small 3oz can of mild green chilies)
    1 14oz can black beans, drained and rinsed
    1 cup frozen corn kernels
    2 green onions, sliced
    1/2-1 tsp chipotle chili powder (you can start with 1/2 and add more to taste)
    1 tsp kosher salt, plus more to taste
    1/4 black pepper, plus more to taste
    1 14.5 ounce can diced tomatoes, preferably fire roasted
    1 1/4 C jack or pepperjack cheese, divided
    3-4 Tbs chopped fresh cilantro
    tortilla chips, just a handful and more for serving if desired.

    Directions:

    Preheat oven to 350. Prepare peppers by washing, slicing tops off, and removing insides. Bring 4 quarts of water to a boil and add 1 tablespoon salt. Boil whole peppers for about 3-4 minutes, until they begin to soften. Remove from water with tongs and place on paper towels to drain.
    Add rice to boiling water and cook until tender, about 13 minutes. Drain thoroughly.
    Heat oil in a 12-inch skillet over medium-high heat. Add onions, garlic, and jalapeno (or chilies) and cook until softened, about 5 minutes. Add corn, beans, green onions, chipotle chili powder, kosher salt, and pepper. Stir until corn and beans are heated through, about 5 minutes. Place peppers in a baking dish. Remove skillet from heat and add rice, tomatoes, 1 cup cheese, and cilantro. Stir to combine well and give it a taste. Add additional salt, pepper, and chipotle powder to your liking. Then evenly divide mixture between peppers.
    Top peppers with remaining 1/4 cup cheese (or more if you can fit it on there :) and crushed tortilla chips.
    Bake at 350 for about 30 minutes.


    Wednesday, July 13, 2011

    Chocolate Zucchini Bread


    I'm on a bread kick these days, must be the diet.  Anyway I'm loving this recipe from Our Best Bites.  It turned out great and my house smells amazing!  I know this is the time of year (or getting close to) when your garden may be overflowing with Zucchini.  Here's one more way to make use of it all!  Delicious!  I give it a 5!  I didn't have any chocolate chips (bummer) and I used applesauce instead of the oil to make it a little more healthy so mine didn't raise as much and yours will be sweeter with the chocolate chips.

    Ingredients:

    2 C flour
    2 t cinnamon
    1/2 t salt
    1 1/2 t baking soda
    6 T unsweetened cocoa powder
    1/2 C canola oil
    1 C sugar
    1/4 C brown sugar
    3 eggs
    2 t vanilla
    1/2 C sour cream
    3 C grated zucchini
    3/4 C mini chocolate chips

    Topping:

    2 T brown sugar
    2 T white sugar
    1/2 t cinnamon

    Directions:

    Preheat oven to 350 degrees. Butter and flour 2 loaf pans and set aside. I actually used one 8" disposable pan to give away and a larger 9" one for me and the batter divided perfectly. So you should get 2 very full 8" pans or slightly less full 9". Do one of each like I did!

    Mix topping ingredients in a small bowl and set aside.

    Place flour, cinnamon, baking soda, salt, and cocoa powder in a small bowl and whisk to combine. Set aside.

    With a stand or hand mixer beat oil, white sugar, brown sugar, and eggs until combined and slightly fluffy, 1-2 minutes.

    Add vanilla and sour cream and mix until combined.

    Gently stir in the grated zucchini.
    Take a spoonful of the flour mixture and stir in with the chocolate chips (that will help keep them evenly distributed.) If you only have regular chocolate chips, or a chocolate bar, just give it a chop so it's the size of mini chocolate chips. Stir remaining flour mixture into batter and mix just until combined. Add chocolate chips and stir to combine.

    Divide the batter between the two pans. and sprinkle topping over each.

    Bake in your preheated 350 degree oven for 50-60 minutes. I set my timer for 45 minutes and then keep an eye on it for the remainder. Ya never know how different ovens handle things.

    When it's done a toothpick or skewer should come out without goopy batter on it and the top will be gorgeous and cracked with sugar.


    Let it cool on a rack for 5-10 minutes and then remove from pans. You definitely have to eat a slice warm. And slathered with butter.

    Tuesday, June 21, 2011

    Fresh Pear Bread

    My kids have a hard time eating pears by themselves and since we got a lot of them in our recent produce co-op I needed to find something to put them in so they didn't go to waste.  I also wanted to be able to eat it without feeling guilty so I found this low fat/calorie recipe and it turned out great!  I give this recipe a 4!  It's around 148 calories a slice so not bad!  This recipe was also on allrecipes.com but with the full fat ingredients (oil instead of a banana and walnuts instead of oatmeal).

    Ingredients
    3eggs
    1 1/2cups sugar
    3/4cup banana, mashed
    1teaspoon vanilla extract
    3cups all-purpose flour
    2teaspoons baking powder
    2teaspoons ground cinnamon
    1teaspoon baking soda
    1teaspoon salt
    4cups pears, peeled, cored and finely chopped
    1teaspoon lemon juice
    1cup oatmeal
    Directions
    In a mixing bowl, combine the eggs, sugar, banana  and vanilla; mix well. Combine flour, baking powder, cinnamon, baking soda and salt; stir into the egg mixture just until moistened. Toss pears with lemon juice. Stir pears and oatmeal into batter (batter will be thick). Spoon into two greased 9-in. x 5-in. x 3-in. loaf pans. Bake at 350 degrees F for 55-60 minutes or until a toothpick inserted near the center comes out clean. Cool for 10 minutes before removing from pans to wire racks.

    Tuesday, May 24, 2011

    Enchilada Chicken Soup

    This was such a great, quick and easy recipe!  I was very surprised that it turned out great.  Our family loves soup and we love mexican so this is a great blend!  I would give this a 4.5!  The only thing I changed was that I didn't use canned chicken...I'm not a huge fan of that.  So if I were you, I'd use shredded chicken breast instead of the canned.  But that's just me!

    Ingredients


  • 1 can (11 ounces) condensed fiesta nacho cheese soup, undiluted


  • 1 can (10-3/4 ounces) condensed cream of chicken soup, undiluted (98% fat free kind)


  • 2-2/3 cups whole milk (I would use a lesser milk fat)


  • 1 can (10 ounces) chunk white chicken, drained (again use shredded chicken breast instead)


  • 1 can (10 ounces) enchilada sauce


  • 1 can (4 ounces) chopped green chilies


  • Sour cream
    Directions

    In a large saucepan, combine the soups, milk, chicken, enchilada sauce and chilies. Cook until heated through. Serve with sour cream. Yield: 7 servings
  • Sunday, January 30, 2011

    7-up Biscuits

    So tonight I made Chicken and Gnocchi soup like you would get at Olive Garden (it's the boys' favorite) and I made these 7-up Biscuits to go with it.  Remember how I said in the last post that I wasn't very good at making bread type things?  Well this was no exception.  I got this recipe from Mylitter.com and it seemed so simple so I had to try it.  Well I made 2 separate batches the other night and the dough just didn't rise!  They were hard as rocks!  I couldn't understand what I had done wrong!  Then I looked at my Bisquick package and it was expired!!!  I mean 2009 expired!  You can tell we don't use Bisquick that much around here!  Well tonight I decided to try it again with not so expired Bisquick (only a few months past the date) and they turned out pretty good!  They taste like the biscuits you would get at KFC or Popeye's!  They didn't rise as much as they should though so maybe I should buy some new bisquick.  So give it a try!  I give this recipe a 4.5PS:  If you want you can "follow" this blog (over on the right) so when you log into your blogger dashboard you can see when I post a new recipe!
    Ingredients
    2 cups Bisquick
    1/2 cup sour cream
    1/2 cup 7-up
    1/4 cup melted butter
    Directions
    1. Cut sour cream into biscuit mix, add 7-Up. Makes a very soft dough.

    2. Sprinkle additional biscuit mix on board or table and pat dough out. Melt 1/4 cup butter in a 9 inch square pan. Place cut biscuits in pan and bake at 450 degrees until golden brown.

    Wednesday, January 26, 2011

    Best Banana Bread Recipe!


    Ok guys I am really no good at making anything that resembles bread so when I first looked at this banana bread recipe I thought, oh I'll just ruin it if I try. But I tried it out and it was awesome! It can't be wrecked! I always have those few bananas that nobody ate in time so they just turn to mush, now I have something to do with them and they won't go to waste! This recipe came from our Provo ward's recipe book c/o Jessica Mathews! It rocks! It makes 2 loaves. I give this recipe a 5!


    Ingredients

    1/2 cup margarine
    1 1/2 cups sugar
    2 eggs, beaten
    3 medium RIPE bananas, mashed
    2 Cups flour
    1 tsp baking soda
    1/2 tsp salt
    1 tsp vanilla
    1 cup sour cream

    Directions

    1. Preheat oven to 350. Grease and flour 2 loaf pans. Cream the margarine and sugar
    together. Then add eggs and bananas. Mix well.

    2. Sift flour, baking soda, and salt together and add to mixture. Then add vanilla
    (and any other mixins like nuts, chocolate chips, etc.) Fold in sour cream.

    3. Bake at 350 for 45-50 minutes or until toothpic comes out clean.

    Bakers note:

    The bananas make the difference between good banana bread and REALLY good banana bread. When the banana gets to the point that it is so brown I wouldn't think of eating it, I put them in the freezer and just thaw them out on a plate on the counter when I need them. When they are thawed out they will be a soup, slimy mess. They are perfect! Always have a freezer full of bananas!

    THANKS JESSICA!!!

    Friday, January 14, 2011

    Potato Broccoli Cheese Soup

    Hey everyone! Hope you're making it through the cold weather months and staying warm. The recipe I have to share with you today will help keep you warm! Who doesn't like soup when it's cold outside?! Anyway, this "recipe" comes from my Mother-in-Law and I put the word recipe in quotation marks because it's one of the recipes that can be adapted and put together pretty much anyway you want but it makes one awesome soup! There will be a lot of commentary with the instructions and ingredient list so you can see what I mean about adapting it. I definitely give this recipe a 5!


    Ingredients
    -Fresh broccoli chopped up (you can also use frozen) use as much or as little as you want
    -Chicken Broth/vegetable broth (again use as much or as little as you want, we like to make a big batch at once because this soup gets better as the days go by, it's great for leftovers!) I used about 58 oz. or 4 cans of broth
    -potatoes cut up small (again as much or as little as you want and it can be cut up as big or as little as you want)
    -chopped carrots (as big or as little, as much or as little as you want)*
    -chopped onions (ditto)*-cornstarch (for thickening use as much or as little depending on desired thickness)
    -shredded cheddar cheese (as much as you want, the more the better!, I used about 3-4 handfulls)
    -salt and pepper to taste
    *as a side note to the onions and carrots, if you have little kids who don't like this kind of thing, then put them in a food blender and get them as finely chopped as you can so they kind of blend into the soup.

    Directions
    Put all ingredients except for the cornstarch and cheese into a pot and bring to a boil. Then simmer until the potatoes and other vegetables are tender.

    Add the cornstarch to desired thickness, then add in the cheese until melted. Salt and pepper to taste.

    Variations: there are many! Use other vegetables if you want. Also if you don't have potatoes on hand (like I didn't tonight) use instant potato flakes instead and then you can skip the cornstarch because the potato flakes will thicken up the soup themselves.

    Sunday, November 21, 2010

    Sweet Potato Black Bean Stew

    One of the many free magazines I receive is called Ready Made. I'm not sure how to describe it but it's kind of a "green" magazine where they make stuff out of the stuff you already have. It's pretty interesting. Anyway I found this recipe and I had a lot of sweet potatoes from the farm co-op we're getting vegetables from so I thought I'd try it. It reminds me of tortilla soup. So this is a different way to make tortilla soup. I'll write in my changes in bold. Since we have little kids, I omitted a few things so it wouldn't be spicy. I give this recipe a 5!

    Ingredients

    1 Tbsp canola oil (I used cooking spray)
    2 sweet potatoes, peeled and chopped into 1-inch cubes (I actually used 3)
    1 onion, peeled and roughly diced
    1 red pepper, seeds removed and chopped into 1/2 inch pieces
    1 jalapeno, diced (I didn't use this)
    1 clove garlic, minced
    1 Tbsp chili powder
    1 tsp cumin
    1 tsp cayenne pepper (I didn't use this)
    3 cups vegetable broth (I used chicken broth)
    1 (14.5oz)can black beans, rinsed and drained
    1 (14.5 oz)can diced tomatoes with juices (you could use tomatoes with diced chiles)
    1 cup frozen corn (I used 1 can corn)
    1/4 cup fresh cilantro, chopped
    1/4 cup lime juice
    shredded cheese to serve
    I added some chicken as well


    Directions

    1. Heat canola oil in a large pot over medium high heat. Add sweet potatoes, onion, red pepper, jalapeno, and garlic, stirring to coat. Saute until onion and peppers are soft, about 4 minutes.


    2. Add chili powder, cumin, and cayenne pepper and stir well. Reduce heat to medium, cover pot, and allow sweet potatoes to soften, about 7-8 minutes, stirring occasionally.


    3. After sweet potatoes are fork tender, add broth, black beans, and tomatoes. Bring stew to a boil, stirring well and scraping the bottom of pot to incorporate all of the spices. Add corn, reduce heat to a simmer, and cook for an additional 15 minutes.


    4. Before serving, stir in cilantro and lime juice. Season to taste with salt and pepper. Serve stew with cheese and additional cilantro if desired.

    Saturday, June 19, 2010

    Tres Leches Cake

    For Tim's birthday I made one of his favorites. He's always talking about this cake so when I found this easy recipe at kraftfoods.com I knew I had to make it. It turned out pretty good. However, I'm not a fan of mushy cake so this cake to me was much better after it had been refrigerated for a few hours. Tim said it tasted pretty much like some of the ones he's had in restaurants so that's good enough for me. I give this recipe a 4.5!

    Ingredients


    1 pkg (2 layer size) white cake mix
    4 squares Baker's semi-sweet chocolate, divided
    1 can (14oz) sweetened condensed milk
    1 can (12oz) evaporated milk
    1/2 cup sour cream
    1 cup thawed cool whip


    Directions


    1. Prepare cake batter in 13x9 cake pan as directed on package. Cool cake
    in pan 10 min. Pierce cake with large fork at 1/2 inch intervals.


    2. Melt 3 chocolate squares as directed on package; set aside. Blend
    milks and sour cream in blender until smooth. Add melted chocolate; blend well.
    Pour over cake, repiercing cake until all liquid is absorbed. Refrigerate 1
    hour.

    3. Meanwhile make curls from remaining chocolate square: Warm the
    square of chocolate by microwaving it unwrapped on high for a few seconds or
    until you can smudge the chocolate with your thumb. Hold the square steadily and
    draw a vegetable peeler over the flat bottom of the square slowly to make long
    curls. Do the same over the short side of the chocolate for shorter curls.

    4. Frost cake with cool whip; top with chocolate curls. Keep
    refrigerated.

    Thursday, June 03, 2010

    Ham and Asparagus Chowder


    This looked so good in the book and I love asparagus so I had to try it. I found it in my Pillsbury Annual Recipes 2008 cookbook. It turned out nice and thick with great flavor. It's been awhile since I made it so I can't remember what I did differently to it. I probably sprinkled cheese on top to serve it. I give this recipe a 5!


    Ingredients:

    1 1/2 cups cubed unpeeled red potatoes
    1/2 cup water
    1 1/2 cups cut asparagus
    1 1/2 cups cubed cooked ham
    1 (10 3/4 oz) can cream of mushroom soup
    1 cup milk
    pepper to taste
    (cheese to top)

    Directions:

    In a saucepan, heat potatoes and water to boiling. Reduce heat to
    medium. Cover; cook about 5 minutes or until potatoes are
    crisp-tender.

    Add asparagus and ham. Cover; cook 3 to 5 minutes or until thoroughly
    heated. Stir in soup and milk. Heat to boiling over high heat,
    stirring occasionally. Sprinkle with pepper (and cheese) before
    serving.