Showing posts with label bread. Show all posts

Thursday, May 30, 2013

Easy French Bread


My friend Christin was nice enough to teach bread making classes and I learned how to make french bread and it turned out amazing!  So some people have asked for the recipe.  So here goes! This picture is of the loaf I actually made at the class!  I give this recipe 5 stars!


This recipe yields 2 loaves

Ingredients:

1 1/2 Tbsp yeast (any yeast)
2 1/2 cups very warm water
3 Tbsp sugar
1 1/2 Tbsp salt
1/3 cup oil
6 to 6 1/2 cups flour

1 egg (whisked)

Directions:

In a large bowl or mixer, combine yeast, water, sugar, salt, and oil.  Mix in half of the flour.  Mix (or knead) the remaining flour in gradually, until it is smooth, and still sticky when you squeeze it but not when you tap it.  (about 6-8 min. on med speed in your mixer)

Allow the dough to rest for 20-30 minutes.

Turn raised dough onto a floured surface.  Lightly dust with flour.  Divide dough in half.  Roll each half into 9x12 rectangle.  Start at the long edge, roll and tuck in, as for a jelly roll.  Seal edge.  Place both rolls seam side down on a large greased baking sheet (or use parchment paper, it's easier!).  Slash top of each loaf diagonally 3 times (or more) with a sharp knife.  Brush with beaten egg, (the more you can brush on, the better).

Let rise 15-30 minutes, or when it looks nice and ready to bake.  Bake at 400 degrees for 25-30 minutes, (or until it has been reddish or golden brown all over for around 10 minutes, but remove if it is bordering on burning.)

Let cool for 10 min. before serving (so you don't flatten it!).


Tuesday, June 21, 2011

Fresh Pear Bread

My kids have a hard time eating pears by themselves and since we got a lot of them in our recent produce co-op I needed to find something to put them in so they didn't go to waste.  I also wanted to be able to eat it without feeling guilty so I found this low fat/calorie recipe and it turned out great!  I give this recipe a 4!  It's around 148 calories a slice so not bad!  This recipe was also on allrecipes.com but with the full fat ingredients (oil instead of a banana and walnuts instead of oatmeal).

Ingredients
3eggs
1 1/2cups sugar
3/4cup banana, mashed
1teaspoon vanilla extract
3cups all-purpose flour
2teaspoons baking powder
2teaspoons ground cinnamon
1teaspoon baking soda
1teaspoon salt
4cups pears, peeled, cored and finely chopped
1teaspoon lemon juice
1cup oatmeal
Directions
In a mixing bowl, combine the eggs, sugar, banana  and vanilla; mix well. Combine flour, baking powder, cinnamon, baking soda and salt; stir into the egg mixture just until moistened. Toss pears with lemon juice. Stir pears and oatmeal into batter (batter will be thick). Spoon into two greased 9-in. x 5-in. x 3-in. loaf pans. Bake at 350 degrees F for 55-60 minutes or until a toothpick inserted near the center comes out clean. Cool for 10 minutes before removing from pans to wire racks.

Sunday, January 30, 2011

7-up Biscuits

So tonight I made Chicken and Gnocchi soup like you would get at Olive Garden (it's the boys' favorite) and I made these 7-up Biscuits to go with it.  Remember how I said in the last post that I wasn't very good at making bread type things?  Well this was no exception.  I got this recipe from Mylitter.com and it seemed so simple so I had to try it.  Well I made 2 separate batches the other night and the dough just didn't rise!  They were hard as rocks!  I couldn't understand what I had done wrong!  Then I looked at my Bisquick package and it was expired!!!  I mean 2009 expired!  You can tell we don't use Bisquick that much around here!  Well tonight I decided to try it again with not so expired Bisquick (only a few months past the date) and they turned out pretty good!  They taste like the biscuits you would get at KFC or Popeye's!  They didn't rise as much as they should though so maybe I should buy some new bisquick.  So give it a try!  I give this recipe a 4.5!  PS:  If you want you can "follow" this blog (over on the right) so when you log into your blogger dashboard you can see when I post a new recipe!
Ingredients
2 cups Bisquick
1/2 cup sour cream
1/2 cup 7-up
1/4 cup melted butter
Directions
1. Cut sour cream into biscuit mix, add 7-Up. Makes a very soft dough.

2. Sprinkle additional biscuit mix on board or table and pat dough out. Melt 1/4 cup butter in a 9 inch square pan. Place cut biscuits in pan and bake at 450 degrees until golden brown.

Wednesday, January 26, 2011

Best Banana Bread Recipe!


Ok guys I am really no good at making anything that resembles bread so when I first looked at this banana bread recipe I thought, oh I'll just ruin it if I try. But I tried it out and it was awesome! It can't be wrecked! I always have those few bananas that nobody ate in time so they just turn to mush, now I have something to do with them and they won't go to waste! This recipe came from our Provo ward's recipe book c/o Jessica Mathews! It rocks! It makes 2 loaves. I give this recipe a 5!


Ingredients

1/2 cup margarine
1 1/2 cups sugar
2 eggs, beaten
3 medium RIPE bananas, mashed
2 Cups flour
1 tsp baking soda
1/2 tsp salt
1 tsp vanilla
1 cup sour cream

Directions

1. Preheat oven to 350. Grease and flour 2 loaf pans. Cream the margarine and sugar
together. Then add eggs and bananas. Mix well.

2. Sift flour, baking soda, and salt together and add to mixture. Then add vanilla
(and any other mixins like nuts, chocolate chips, etc.) Fold in sour cream.

3. Bake at 350 for 45-50 minutes or until toothpic comes out clean.

Bakers note:

The bananas make the difference between good banana bread and REALLY good banana bread. When the banana gets to the point that it is so brown I wouldn't think of eating it, I put them in the freezer and just thaw them out on a plate on the counter when I need them. When they are thawed out they will be a soup, slimy mess. They are perfect! Always have a freezer full of bananas!

THANKS JESSICA!!!

Friday, September 01, 2006

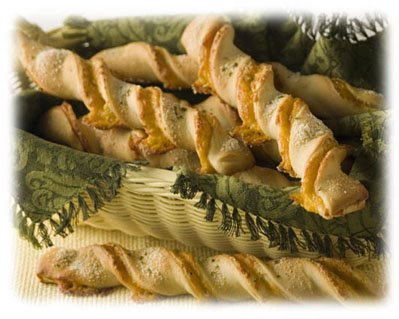
Cheesy Green Chile Twists


I've been on vacation and therefore haven't been cooking and tonight I didn't make dinner either. I thought I was going to be making dinner but Tim's brother stopped by with his family and they wanted to go out to eat (I'm not complaining) but I had already started part of the dinner so I had to make it anyway....and here it is. It comes from the Rhodes Rolls recipes that I get in my email from time to time. They turned out really well even though we only "tasted" them since we were going out to eat....I guess we'll eat them tomorrow. The only problem I had was rolling them out in the 18X12 rectangles they wanted...who knows what size the rectangles I rolled out were so I didn't end up making 12 twists but more like 8 and then I cut them in half because they were so big after they baked. But really...they tasted really good. Any recipe that has green chiles is "usually" good. I give this recipe a 4.5


Ingredients

24 Rhodes™ Dinner Rolls, thawed and risen
2 tablespoons butter, melted
2 cups shredded sharp cheddar cheese
2 cans diced green chilies, drained
grated Parmesan cheese

Directions

Combine 12 rolls together and roll into an 18x12-inch rectangle. Repeat with remaining 12 rolls. Brush both dough rectangles with butter. Combine cheese and green chilies and sprinkle over one dough rectangle. Top with remaining dough rectangle, butter side down. Cut into twelve 1 1/2-inch strips. Twist each strip several times. Place at least one inch apart on large sprayed baking sheets. Sprinkle with Parmesan cheese and let rise 30 minutes. Bake at 350°F 15-20 minutes or until lightly browned.

Tuesday, January 24, 2006

Simple Chili and Breadbowls!

Ok so tonights dish was chili found on pg 37. I found a bread bowl recipe online that is really easy and it turned out great. I'll put that at the bottom. So my husband always says he doesn't like chili, but since I do, I made it. It turned out great! In my 5 qt crock pot I cooked it for 3 hours on high. I actually didn't even have to change anything in this recipe (first time!). I give this recipe a 5 because I LOVE chili!

Ingredients

2 lbs ground beef, browned and drained
1/2 cup dried minced onion or 1 large onion, chopped
1 large can (28 oz) diced tomatoes, with liquid
2 cans (8oz each) tomato puree
1 can (16 oz) kidney beans, with liquid
1 can (4 oz) diced green chiles, with liquid
1 cup water
1 tsp minced garlic
2 Tbsp chili powder
2 tsp salt
1 tsp pepper

Directions

Combine all ingredients in a greased slow cooker. Cover and cook on
high heat 2-3 hours or on low heat 4-6 hours. Serve in bread bowls.
Makes 6-8 servings.

Ok now here's the recipe to make easy bread bowls:

One 1 lb., 13 oz. can of Pillsbury Grands Biscuits (Golden Corn, Wheat, etc.)

1.Heat oven to 350°. Make four 5" balls of foil by crushing four 50"x12" pieces of foil. Flatten tops slightly. Place foil balls on large cookie sheet.

2. Separate dough into eight biscuits. Combine two of the biscuits together and roll into a 6-8" circle. Place dough over a foil ball, shaping gently to fit and make a bowl shape. (Dough should not touch cookie sheet.) Repeat with remaining dough. If you only have the smaller biscuits that make 10 biscuits use 4 or 5 of those biscuits to make the circle.

3. Bake at 350° for 15 to 18 minutes or until golden brown. Carefully remove bread bowls from foil so they do not tear.

4. Place ½ cup of soup or chili in each bread bowl. Top with cheese if desired.

PS: Just to let you know, you'll have chili coming out of your nose after you make this if you're only making it for 2 people. So be prepared to love chili for a while or freeze it for later.